OS X
-
Removing the Caps Lock Delay on a Macbook
Update 9/23/2016: This solution is still going strong in El Capitan. I haven’t installed macOS Sierra yet, but it looks like the functions of Seil might be integrated in the new Karabiner-Elements. Karabiner is broken for now. When I update, I will edit this post with fixes for Sierra, if any.
I’m glad this post appears to have helped some people!
Original Post:
So, I recently ran across what Apple calls a feature, and what I call a pain in the butt. Namely, the caps lock button doesn’t always activate when you press it – you have to press it longer than usual to activate it. I’m a fairly fast typist, and I use a mechanical keyboard at work, so this drove me up the wall. This is supposedly to reduce accidentally activation of the caps lock key when you really meant to type the letter “A”, but that rarely, if ever, happens to me, so it just felt like punishment for typing quickly. I wouldn’t mind it if there was some easy way to turn it off and on, but I think we all realize by now that Apple doesn’t believe in turning off features they deem a part of their vision. (Like say, hiding the full url in the address bar.)I found a workaround of a sorts, but it involves turning off and on the caps lock key in System Preferences > Keyboard > Modifier Keys, but there was a catch – sometimes it’ll forget your setting after rebooting or waking up, and you’ll have to do it again. Besides, it sounded like an hack-ish, unintended feature that Apple could take away at any moment. So I decided to go look for a slightly more permanent solution. Unfortunately, it does involve third party programs, but it definitely works (as of writing, on OS X Mavericks, 10.9.4)
This post and this documentation helped guide me to the right direction, though the names of the program have changed a bit. Here’s what you do:
- Install Seil and Karabiner.
- As per Seil’s documentation, go to System Preferences > Keyboard > Modifier Keys and change “Caps Lock” to “No Action.”
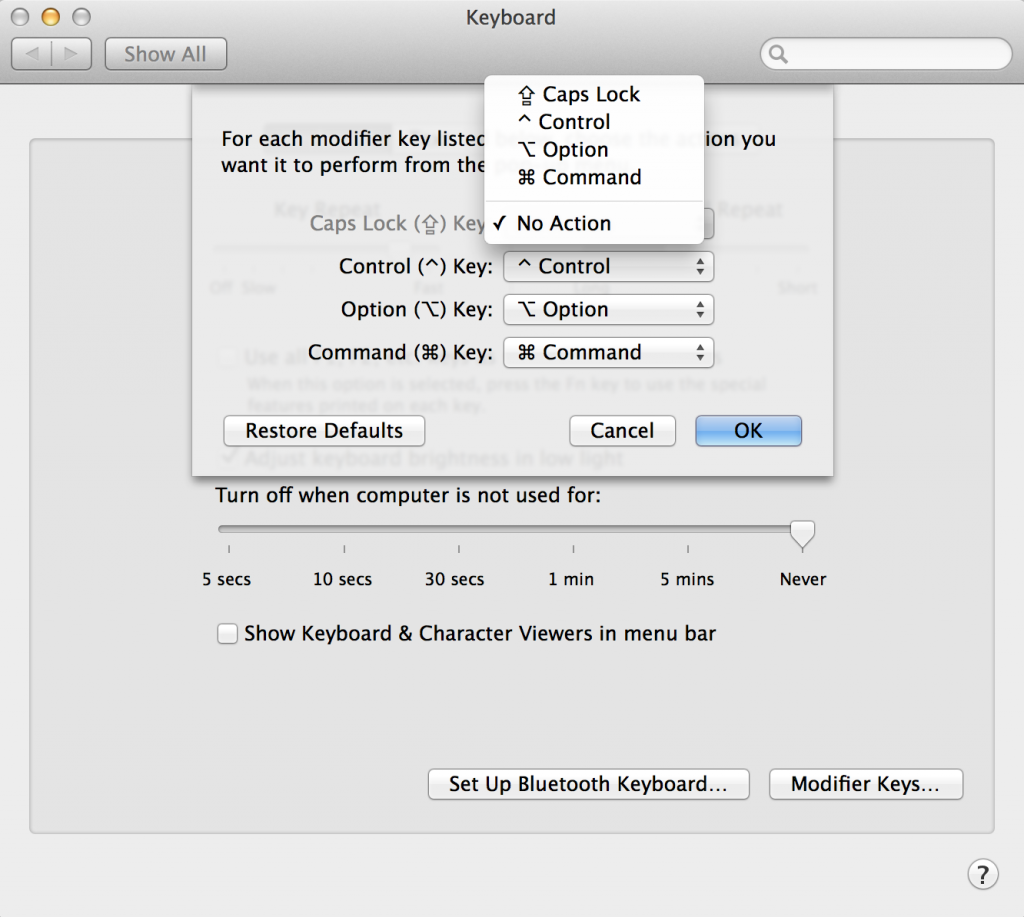
- Using Seil, check “Change Caps Lock Key” and change the key code to 110. (Application Key)
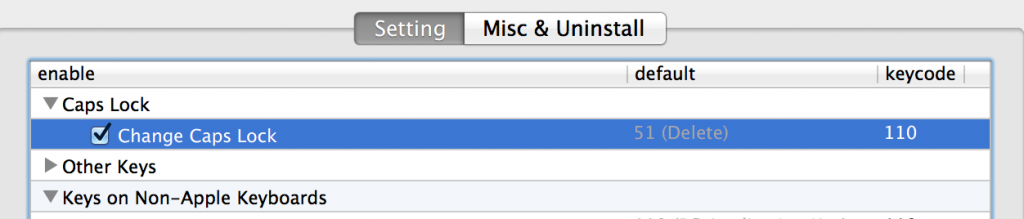
- Go to Karabiner, and in the search box, enter “application key to capslock.” Under For PC Users > Change PC Application Key, check off “Application Key to CapsLock.”

- Close the window. Done! Insanity averted, for now.
-
Installing a LAMP Stack and mcrypt on OS X Mavericks
I can install a LAMP stack in my sleep on Windows, but the process is considerably different on a Mac. For the record, I don’t like installing packages such as XAMPP/MAMP, because I like to have complete control over which versions of each component are installed. Also, I find it a good idea to know how to install each program individually, so you know how to set it up on a non-development server.
The following is going to be heavy on links and commentary.
First off, I installed xcode from the Mac App Store. I wanted it anyway for Objective-C testing, but also to install homebrew. (Clever url, that one.) I installed that because I am a definite fan of package management. After installing homebrew, I immediately ran a
$ brew update
so it was ready to go.
I started off with this guide. So, the Apache portion. Turns out that OS X ships with its own version of Apache. (As of writing, 2.2.26.) That was perfect for my purposes (Magento doesn’t support Apache 2.4.x). Apache is located in
/etc/apache2, runs as the httpd process, and as the user _www.The apache httpd conf is located at
/etc/apache2/httpd.confI changed the ServerName toServerName localhost:80
Apparently that gets rid of Apache warnings about not finding the fully qualified domain name. I also enabled the PHP module with
LoadModule php5_module libexec/apache2/libphp5.so
Now, I needed a vhost. The guide I was following, and others mentioned below, set up their vhost with a VirtualDocumentRoot, so it can change the document root based on the request url. For example, if I request folder123.dev, Apache can look for the files in folder123. For folder456.dev, it’ll look in folder456. So, I created a container for the document root in my home directory,
$ mkdir ~/Sites
I also created
~/Sites/sandbox/htdocs, giving ownership to the _www user, and making sure the group (staff) had write access.$ sudo chown -R _www htdocs $ sudo chmod -R g+w htdocs
Definitely remember the chmod portion or else you’ll be as confused as I was when you can’t download files into that directory.
The guides recommended creating a conf in the users directory at
/etc/apache2/users/. However, I was curious how it was being included automatically. If you look at httpd.conf, you’ll see this under Supplemental Configuration.# User home directories Include /private/etc/apache2/extra/httpd-userdir.conf
If you open that file up, you’ll see the following lines.
#
# Users might not be in /Users/*/Sites, so use user-specific config files.
#
Include /private/etc/apache2/users/*.conf
So, I created my own dchan.conf and added these lines to it, changing /Users/username to my own home directory.
  ServerName dev
  DocumentRoot /Users/username/Sites
  VirtualDocumentRoot /Users/username/Sites/%-2/htdocs
  UseCanonicalName Off


    AllowOverride All
    Order allow,deny
    Allow from all
I restarted Apache using apachectl, and confirmed it was running.
$ sudo apachectl restart
$ ps aux | grep httpd
Next was PHP. PHP is also preinstalled, version 5.4.24 in my case. php.ini had to be created, fortunately there was already a template.
$ sudo cp /etc/php.ini.default /etc/php.ini
I enabled
display_errors = On. Not much configuration to do at this time. I restarted Apache again.The last part, MySQL. I had homebrew install it.
$ brew install mysql
I then unset the temp directory and initialized the MySQL data directory/system tables.
whoamidynamically retrieves your current user account.$ unset TMPDIR $ mysql_install_db --verbose --user=`whoami` --basedir="$(brew --prefix mysql)" --datadir=/usr/local/var/mysql --tmpdir=/tmp
I also wanted MySQL to run automatically upon system startup. Now, this was a new experience. It looks like there isn’t an equivalent to the “Services” GUI in OS X – there’s only launchctl. I thought that was somewhat at odds with the other user friendly aspects of the system, but I rolled with it. To add MySQL to the startup programs, I used these commands, from this guide:
$ mkdir -p ~/Library/LaunchAgents
$ ln -sfv /usr/local/opt/mysql/*.plist ~/Library/LaunchAgents
$ launchctl load -w ~/Library/LaunchAgents/homebrew.mxcl.mysql.plist
There are two types of services – Launch Agents and Launch Daemons. According to this,
“launch daemons can run without a user logged in. Launch daemons cannot display information using the GUI. Launch daemon configuration plist files are stored in the /System/Library/LaunchDaemons folder (for those provided by Apple et al) and /Library/LaunchDaemons (for the rest). Launch agents run on behalf of a user and therefore need the user to be logged in to run. Launch agents can display information through the window server. As with launch daemons, launch agent configuration plist files are stored in the /System/Library/LaunchAgents and /Library/LaunchAgents. User launch agents are installed in the ~/Library/LaunchAgents folder.”
Lastly, it was time to set a root password.
$ /usr/local/Cellar/mysql/5.6.19/bin/mysqladmin -u root -password 'PASSWORD HERE'
Then I manually started mysql.
$ mysql.server start
Now, one thing about connecting to MySQL – you can’t use the “localhost” string. I noticed the same issue in Windows 8 – I had to specifically use 127.0.0.1. There are two solutions to this, both documented here. One is just use 127.0.0.1, and the other is to create a symlink between /tmp/mysql.sock and /var/mysql/mysql.sock, linking whichever file is missing. I opted for the former solution, as it seemed less hacky.
Now that all the components are installed, I needed some DNS management. I could edit the /etc/hosts file, but I wanted to see if there was anything more elegant, and indeed there was.
There’s a utility called dnsmasq, conveniently available via homebrew.
$ brew install dnsmasq
$ sudo cp /usr/local/opt/dnsmasq/homebrew.mxcl.dnsmasq.plist /Library/LaunchDaemons
I then created a conf file at
/usr/local/etc/dnsmasq.conf. Like the other guides, I decided to go with a “.dev” wildcard domain for my folders, so my site would be available at sandbox.dev. (Apparently you can’t use the .local domain, because it’s reserved by OS X.)# /usr/local/dnsmaq.conf address=/.dev/127.0.0.1 rebind-domain-ok=/xip.io/nip.io/
I loaded it into launchctl.
$ sudo launchctl load -w /Library/LaunchDaemons/homebrew.mxcl.dnsmasq.plist
Now we need to connect dnsmasq to the OS DNS servers. Per this guide,
Navigate to System Preferences -> Network -> WiFi (or your most used network interface) Click Advanced, and go the DNS tab. Under DNS servers, add 127.0.0.1 at the top of the list, followed by 208.67.222.222 (or any other nameserver).
However, apparently you’ll have to do this for each wifi network you connect to. That sounded like a bit too much work, but this handy guide has two scripts that can take care of that.
There are two files you have to download.
Then I ran the following commands, per the above guide.
mv setdns.sh /usr/local/bin
chmod a+x /usr/local/bin/setdns.sh
sudo cp com.zizproductions.setdns.plist /Library/LaunchDaemons
sudo launchctl load -w /Library/LaunchDaemons/com.zizproductions.setdns.plist
Now going to http://sandbox.dev shows me the files I’ve placed in ~/Sites/sandbox/htdocs. Awesome.
At this point, I’m almost, but not quite ready to install Magento. I need mcrypt. This is something that was much easier on Windows, because all you have to do is uncomment a line to load in a precompiled .dll file. However, on OS X, there doesn’t seem to be any way around compiling the extension yourself.
Some sites have you download and compile libmcrypt, but per this site, our ever-handy homebrew, it can take care of that too.
$ brew install autoconf mcrypt
I downloaded the PHP source for my version. I extracted it and navigated to the ext/mycrypt folder. I then attempted to run
/usr/bin/phpize, but here’s the output I received.$ /usr/bin/phpize grep: /usr/include/php/main/php.h: No such file or directory grep: /usr/include/php/Zend/zend_modules.h: No such file or directory grep: /usr/include/php/Zend/zend_extensions.h: No such file or directory Configuring for: PHP Api Version: Zend Module Api No:
I knew this was incorrect because I compared that to the desired output here. Well, this stumped me for quite some time. I was in the correct directory, phpize existed, everything seemed to check out. Some posts mentioned that the xcode command line tools needed to be installed, and I thought they were because both xcode-select and gcc existed and returned output.
$ xcode-select -p
/Applications/Xcode.app/Contents/Developer
However, I found out it was not the case. I had to actually enter
$ xcode-select --install
and then say yes to the install dialog box. With that out of the way, phpize now returned the proper output.
$ /usr/bin/phpize
Configuring for:
PHP Api Version:         20100412
Zend Module Api No:      20100525
Zend Extension Api No:   220100525
Now to continue on.
$ ./configure
$ make
$ sudo make install
Now, I had to enable the newly compiled .so in
/etc/php.ini. I added this lineextension=mcrypt.so
I restarted Apache for one last time
sudo apachectl restart
Finally, we’re in business. I installed Magento, remembering to enter 127.0.0.1 as the database host. And we’re off!
-
Mac OS X Mavericks – First Impressions from a Windows User
I’ve pretty much spent my entire life as a developer on Windows. I mean, of course I had putty to interact with the servers, which were some flavor of Unix, but my personal workstation was always Windows. (Fortunately, I skipped Windows ME, also known as the “the Windows of which we shall not speak.”)
However, times have changed, and Apple has come very, very far from the sad iMacs and hockey puck mice of my high school days. Also, my laptop was in definite need of replacement, so I decided to go and get a new Macbook Pro. I also wanted to try my hand at iOS app development. I’ve played around briefly with other people’s Macs, and was suitably impressed with the mouse gestures and retina display, but I had no idea about how it like to work with day to day.
So, here are my initial thoughts and experiences.
Cut and Paste of Files is Missing?
I noticed that there was nothing in the context menu to “Cut” files. I could Copy and Paste them, sure, and I could drag them around, but no actual “Cut.” A friend informed me that there’s a hot key, cmd+option+v (Copy and Move), but no corresponding gui option. Why? I have no idea, but it’s slightly annoying.No way to sort first by folders or files, and then alphabetically.
I noticed this the first time I played with a Mac, but you can’t sort things by my preferred method, by files or folders, and then each group alphabetically. You can sort by “kind,” but that doesn’t quite do the trick – because all the files are then sorted by kind, as well. There doesn’t seem to be a workaround at this time.Can’t create new empty files from Finder
I make frequent use of the “create new text file,” in Windows, using it to create new empty files on the fly, changing the extension to the desired file type. Sadly, there’s no equivalent in OS X.The Good
Putting the computer to sleep and waking it up is seamless, and the retina display is gorgeous. Mouse gestures are great and speed things up considerably.The Random
I can feel it venting heat from the keys! My fingers can literally be on fire.


